Sourced from: https://www.loveandrenovations.com/diy-concrete-coffee-table/
What happens when you fall in love with the perfect outdoor coffee table, only to discover it’s sold out? You make your own! Here are the details on my DIY concrete outdoor cofee table.
This post contains affiliate links. Click here to read my full disclosure policy.
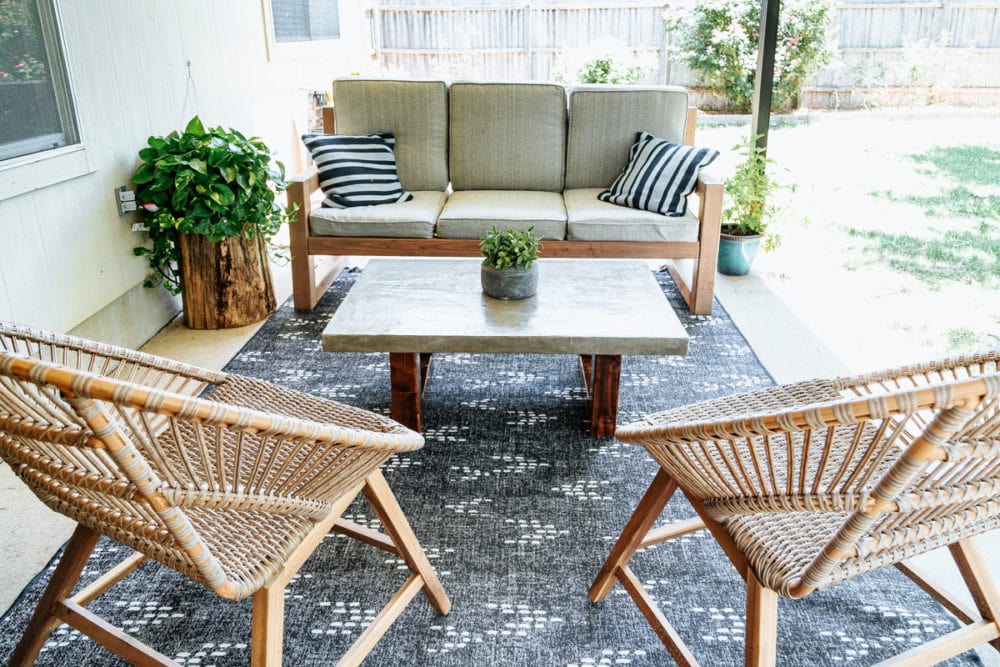
I don’t mean to sound like a broken record, but I cannot believe how far our backyard has come in the last few months, y’all. I was honestly pretty nervous when you decided that I should tackle our back porch this summer because it felt like such a daunting task, but I am so (so!) glad we did. This space has become one of my very favorite places to be, and I can’t wait to wrap the last few projects up and call this space finished!
If you haven’t been following along with this summer makeover, here’s everything you may have missed:
- The first outdoor projects we tackled this summer were painting our backyard shed…
- …and sprucing up the rose beds.
- Then, we started the big makeover by building a DIY paver and pea gravel patio.
- Once it was done, we styled it and started using the heck out of it.
- Then we turned our attention to the back porch – first, we painted the metal covering.
- And then we built a DIY outdoor sofa for lounging!
- Finally, earlier this week I shared the DIY plant wall I created to add some life to the porch.
Today I’m sharing the (gorgeous) DIY outdoor coffee table we built, and then there’s just one more big project to share before the official reveal (NEXT WEEK, Y’ALL!).
This coffee table has been on my mind since the very beginning of this entire renovation. It started when I was shopping for furniture for the porch and I found the Palmera Faux Concrete Coffee Table from World Market (no longer available, but see the other stuff in the line here). It was everything I wanted for this space, and y’all agreed when I put it to a vote over on Instagram.
Of course, it wasn’t until after this coffee table won the vote by a landslide that I discovered that it was out of stock. And, once I contacted World Market I was told they weren’t sure when (or if) it would be brought back.
Perfect.
Thankfully, the design is pretty simple and I felt confident that Corey and I could re-create the same basic look – and probably for a lot less money! This project was incredibly cheap, since we were able to use some scraps from our outdoor sofa for the legs. Even if you need to purchase the wood, the materials for this entire build should set you back no more than $100 or so – and you know I love saving money!
Ready to learn how to make your own?! Let’s do it!
DIY Concrete outdoor cofee table
tools + Materials Needed:
- (1) 8-foot 4X4 board
- (1) 8-foot 2X2 board
- Beadlock Pro Joinery System
- Wood glue
- 1/2 sheet of 1/2″ plywood
- Wood filler
- Drill/driver set
- Power nailer
- Henry Feather Finish
- Trowels (I used a couple of different sizes, see below)
- Orbital sander + various grit sandpapers
- Black Diamond Wet Look Sealer
- Spar Urethane
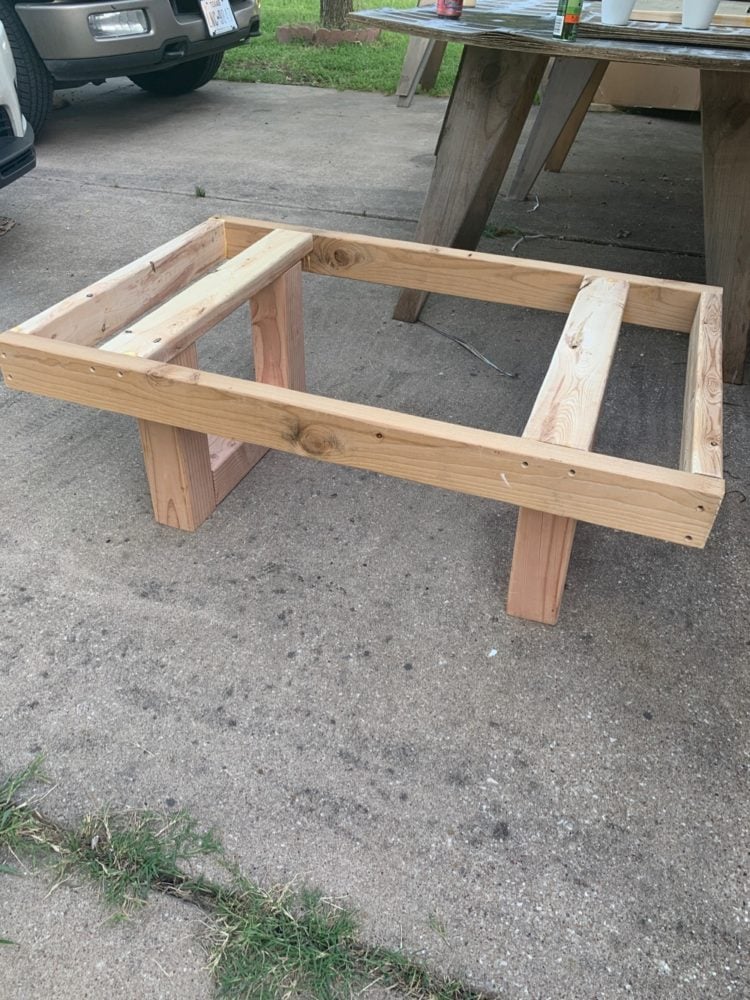
STep One: Build the Legs
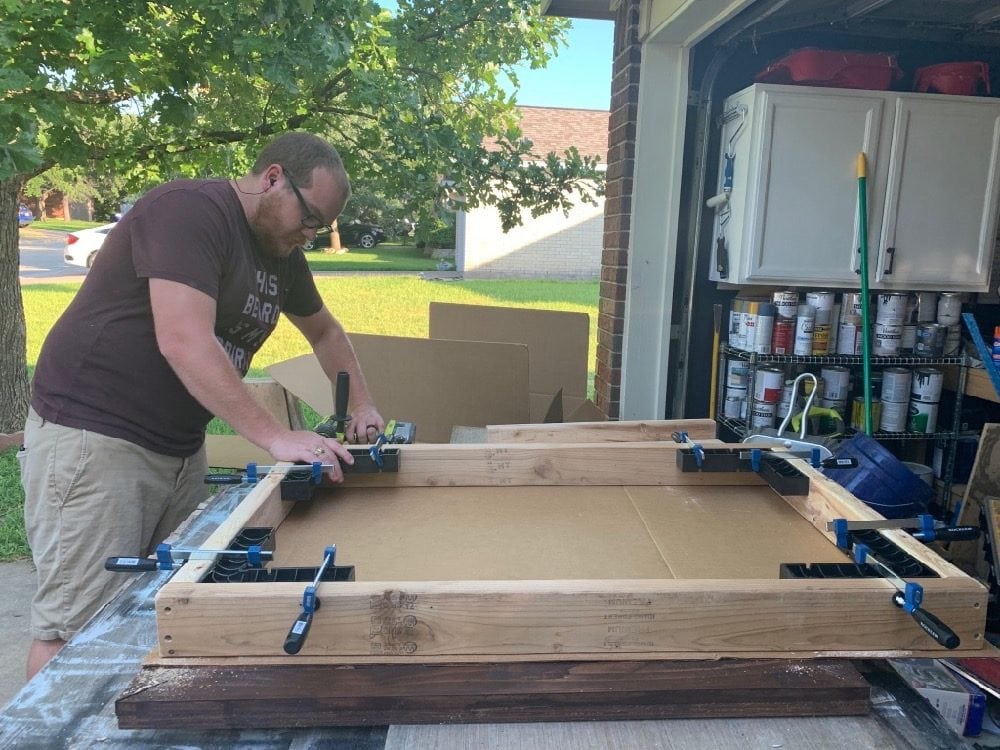
For the legs, we used pretty much the exact same process that we used on our outdoor sofa. We loved the invisible joints created by Rockler’s Beadlock Pro and it was the perfect tool to use again for this project. However, you could also use pocket holes or even just extra long screws (like these) if you don’t mind the visible hardware.
Each leg is made up of two 14″ pieces with one 13″ piece in the middle. We put them together using the loose tenon joints but, again, if you aren’t comfortable with those joints or don’t have the jig, I’d recommend just using extra long lag screws and wood glue.
Just like with the couch, I recommend sanding the wood for the legs (starting with 80-grit and working up to 320-grit) before assembling them!

Step TWo: Assemble the top Frame
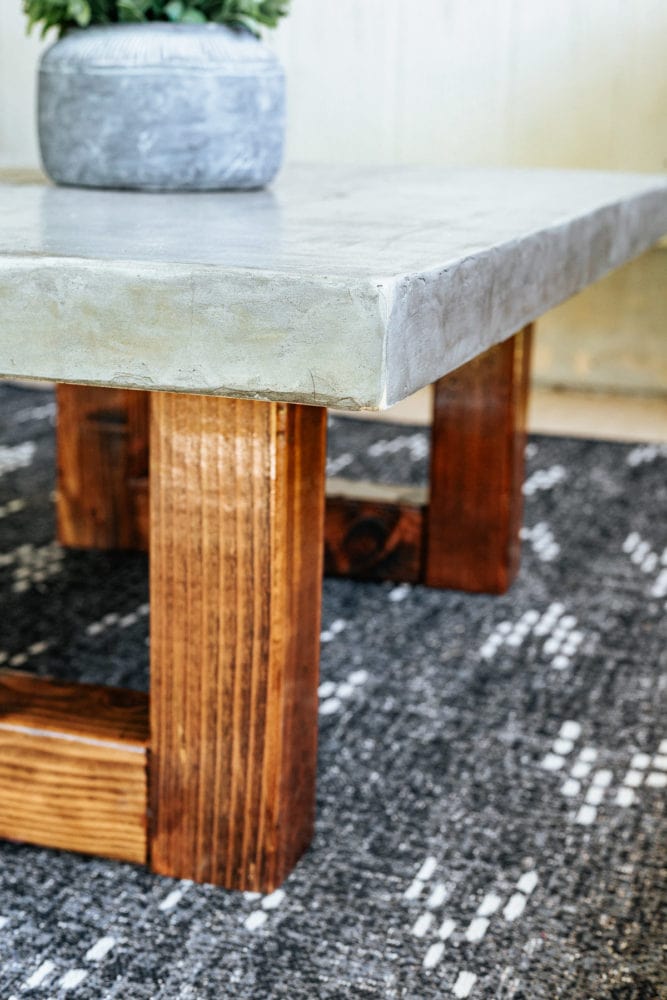
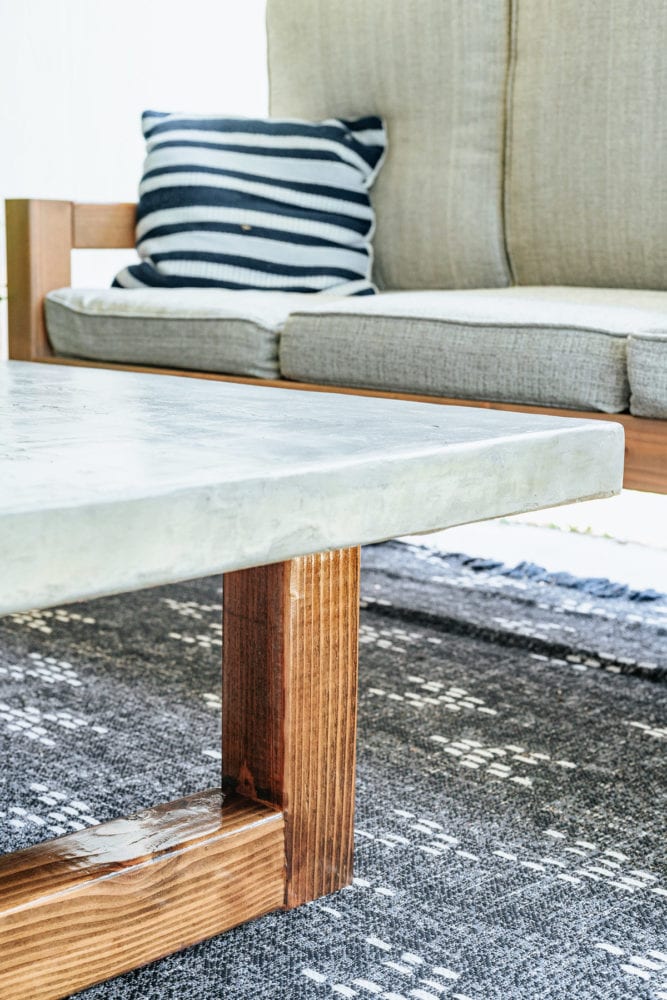
Once the legs are built and dried, you’re ready to assemble the top of the table. We wanted a concrete look without the weight of an actual concrete slab, so we built a wood top and covered it with Henry Feather Finish. I’ve seen people use this stuff on countertops dozens of times over the years, and I’ve always wanted to try it so this was the perfect opportunity!
To build the top, we started by making a 29″X44″ rectangle frame using 2X4s. We ended up deciding it was too thick, and we cut down the excess, so I’d actually recommend just starting with 2X2s to make your life easier! We used wood glue and screws to assemble this part of the table.
Once the outside is built, you’ll add your supports for the legs. We just cut two 2×4’s to fit inside the rectangle, then placed them 5″ in from either side – they’re attached with wood glue and screws, just like the rest of the top!
Then, we set everything up really quickly to see how we liked it – and, of course, this is when we noticed that the top was much too thick! Corey just ran it through the table saw to cut it down, but I’d recommend starting with 2X2’s for the outside pieces – that’s about what we cut it down to.
To attach the legs to the top, simply apply wood glue to the tops of the legs and then drill the top into the legs from the top of the supports.
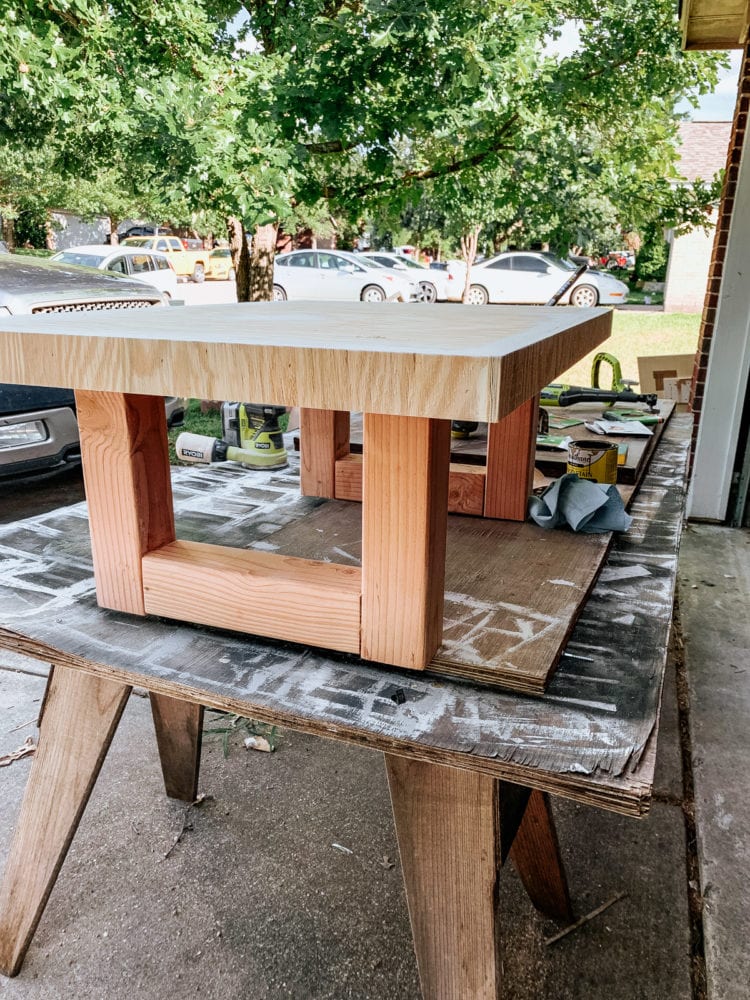
Step three: attach plywood to top
Next, we wrapped the entire frame with some 1/4″ plywood. You should have five pieces, cut to the specific measurements listed above (though, I recommend that you double-check the measurements on your specific table before cutting, just in case you made any small mistake along the way that would cause it to be a slightly different size!).
Attach the large piece of plywood to the top using wood glue and nails (we use this power nailer), and then attach the side pieces on the sides of the frame with the same method. After you’ve attached all of the plywood, you should use some wood filler to fill in any gaps, cracks, or nail holes!
It should look something like this when you’re all done!
Step Three: finish the legs
Now the bones of the table are finished and it’s time to make it look pretty! I chose to stain the legs using Varathane’s Dark Walnut stain, but you could also paint them if you prefer. My original plan was to actually paint them black, but I didn’t have any exterior paint on hand so I decided to use something I did have instead.
Once you’ve stained the legs, be sure to apply spar urethane to protect them from the elements outside. It typically requires several coats with sanding in-between, so don’t rush this step!
Step Four: Apply Feather Finish to top
Now you’re ready for the fun (and slightly terrifying) part: applying the feather finish to the top!
The most common brand of feather finish I’ve seen used for this kind of project is Ardex Feather Finish, but I didn’t wait to wait for it to be shipped so I just grabbed the Henry brand Feather Finish in store. I think they’re pretty comparable, so either should be fine.
To apply your feather finish to the table top, start by mixing it up (mine had a ratio of 2 parts water to 1 part powder) in small batches. I just mixed mine in one of these little pails (with a liner) and I found that it was just the right size. If I tried to get too much going at once, it started to harden towards the end of the batch – and this stuff is much easier to work with when it’s on the looser side! Think of the texture you’re shooting for as a loose cake frosting – it should be super easy to spread but thick enough that it won’t just slide off the edges of the table when you apply it vertically.
I applied three layers of feather finish (though, I probably could have gotten away with just two). The first two layers really just need to provide coverage – don’t stress too much about making them smooth! I used both an angled trowel and a wide putty knife to apply the concrete and I found that the best strategy was to get the concrete on the table and mostly spread out with the trowel, then switch to the putty knife to really spread it out and smooth it as much as possible.
After each layer dries, grab some 80-grit sandpaper and your orbital sander and go to town – you’re looking to just smooth out the rough edges and the ridges in the table. You aren’t shooting for perfection with these first two layers!
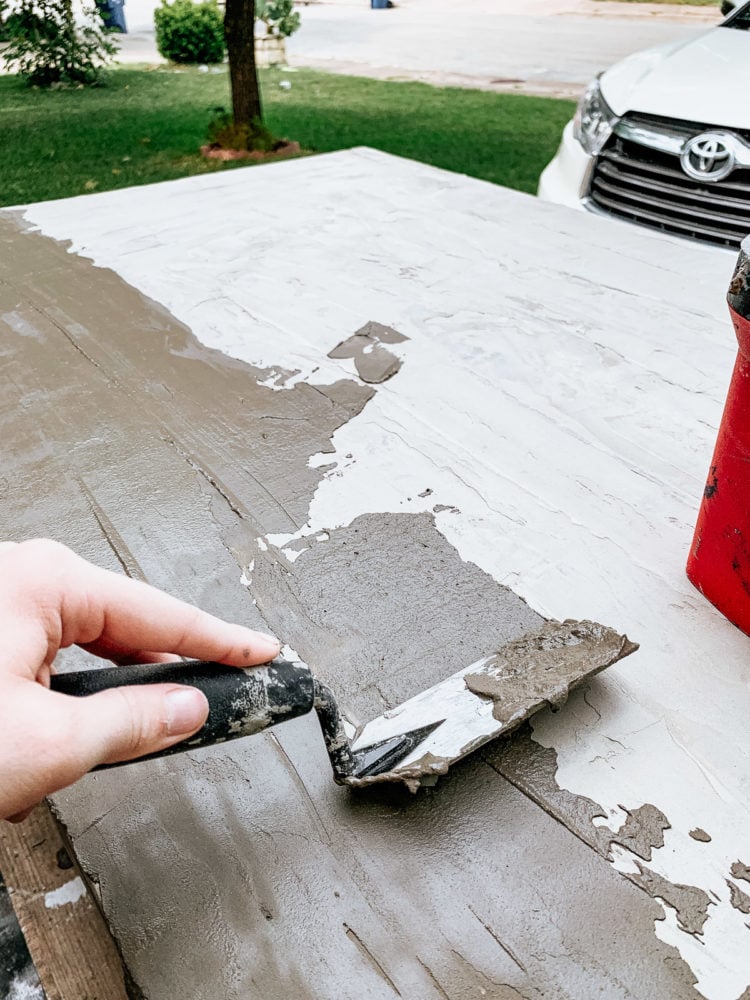
On the final layer, I worked much slower when applying the concrete and I really tried to focus on minimizing any lines in the finish. This is the layer everyone will see, and it’s the one you’ll be sanding to perfection, so really take your time with it!
Once it has dried fully, you’re ready for the final sanding process. I started with 80-grit sandpaper, then slowly stair-stepped my way all the way up to 320 (meaning, I sanded the entire thing with 80-grit, then 100-grit, then 120-grit, etc.). It takes a long time to get it fully sanded, but the buttery smooth texture is worth it.

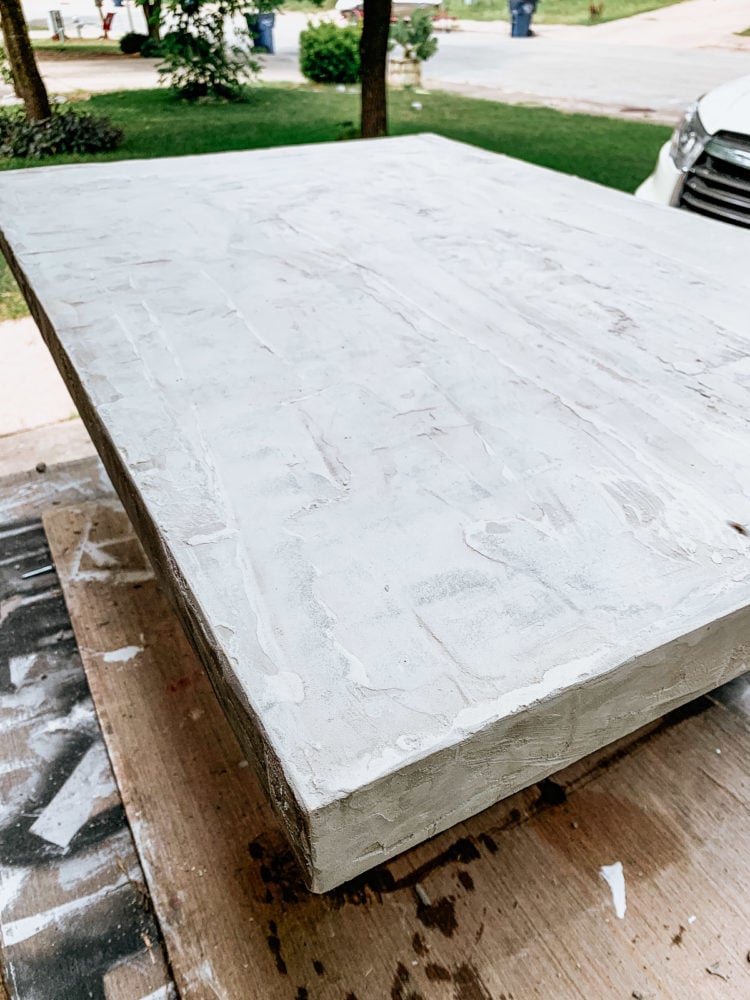
Step Five: Seal the table top
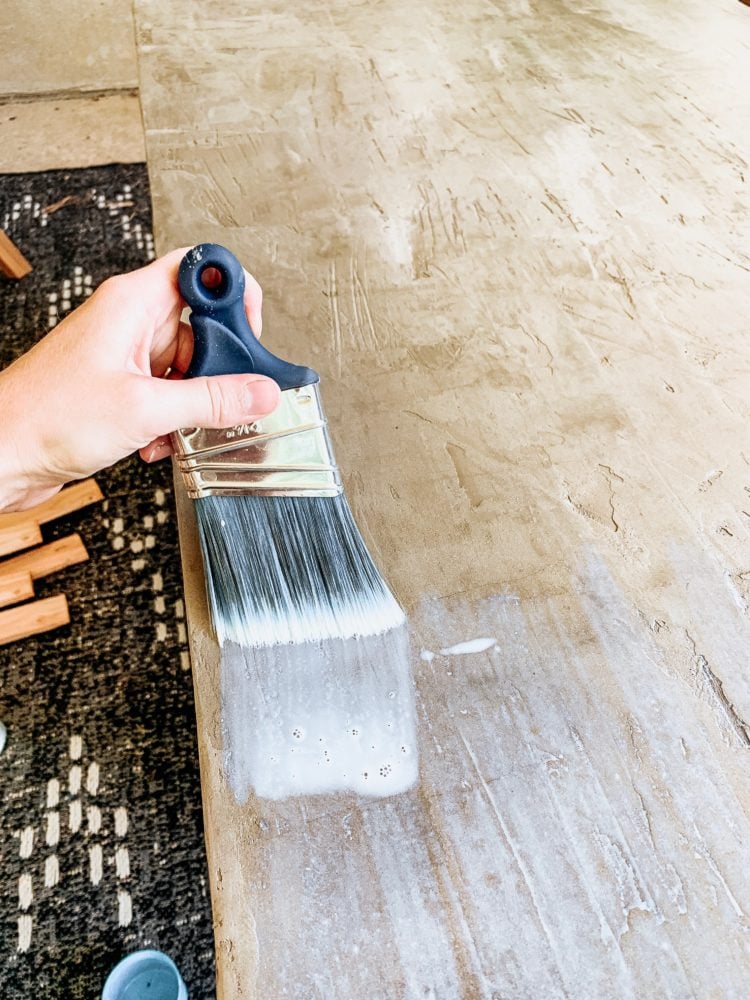
After I finished the table top, it was time to seal it. Thankfully, since this is just a coffee table and not concrete counters (which is where I see this product used most often), I didn’t need to worry about a food-safe sealer! I used this wet look sealer and it was a breeze to apply!
I applied three thin coats using a regular old paintbrush. It’s very thin, so be careful not to allow it to pool at all as it’s drying. Each coat needs to dry for about an hour before applying the next one, and I found that it stayed really smooth and I didn’t need to sand in-between coats at all.
Once it’s fully dry, you’re good to go!
I am so, so happy with how this little faux concrete table turned out and I honestly can’t wait to tackle another project using feather finish concrete! It was so much fun, and the finished look is truly, absolutely beautiful.
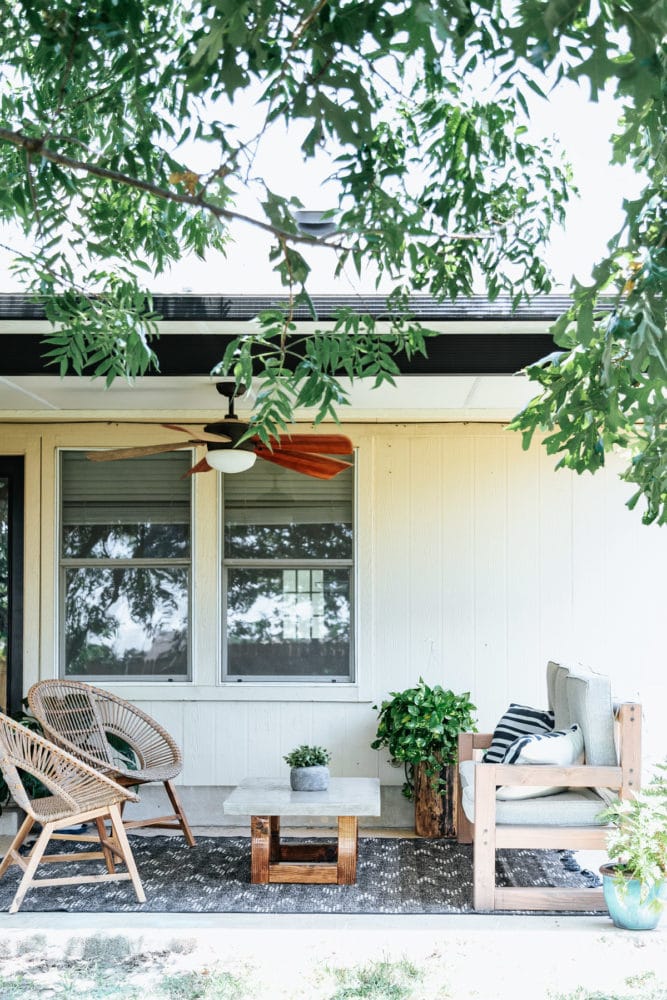
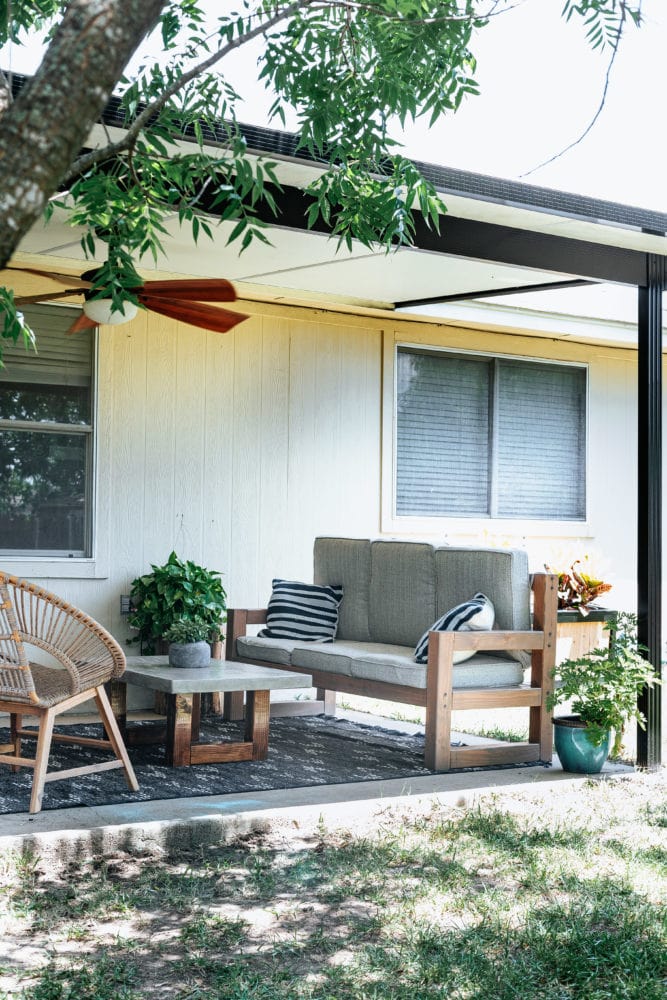
With this project complete, we’ve only got one big project left back here before we’re ready to accessorize and call this back porch complete!
Be on the lookout for the final project later this week, and the full reveal is coming next week!
What do you think I should use the feather finish on next? An indoor dining table? Nightstands? I kind of want to cover everything with it!
The post DIY Concrete Outdoor Coffee Table appeared first on Love & Renovations.