
Have you ever wanted to pour a large concrete slab on your property but felt like the only way was to hire a contractor or bring in extra help? For most DIYers the idea of pouring concrete is firmly in the realm of “hire a pro”, especially if we’re talking about something more than a few square feet.
I’m going to show you that’s not always true.
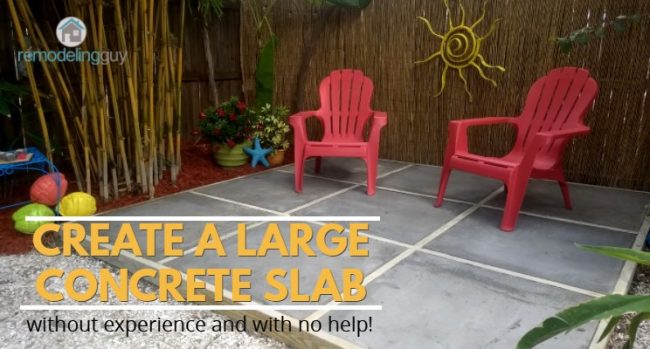
I used Sakrete Crack Resistant Concrete to create the garden area slab shown here over a weekend. Here are a few design highlights:
- The slab is 9’ x 9’ for a total of 81sf
- The grid pattern forms look great and make this an easy one person project
- Sakrete’s Crack Resistant Mix requires no extra reinforcement
- This is a very low-cost, high-durability, beautiful hardscape project
This project allowed me to easily convert an unused and kind-of ugly portion of my backyard into my new favorite outdoor spot.

Large Slabs Usually Mean Extra People, Equipment, and Expense
The thing with larger slabs is that they usually require the entire amount of required concrete at one time. If you don’t pour the whole thing at once, you get cold joints. Cold joints happen when concrete poured into a slab is allowed to partially or completely dry before more concrete is added. Cold joints usually don’t look good at all.
In order to get all the needed concrete ready to pour at once, people often call for a concrete delivery from a ready-mix company. Unfortunately, a slab this size only requires about one cubic yard of concrete. Ready mix concrete trucks (the big concrete trucks that deliver concrete and spin) usually have a three yard minimum order. So that won’t work for a slab this size.
In this situation people often go for “U-Cart” type concrete where you go to a provider who rents you a trailer with a yard of mixed and ready-to-pour concrete in it. The problem with that is that you need to be able to get the trailer pretty close to the work area, or you’re going to need to wheelbarrow the concrete a long distance. Wheelbarrowing wet concrete isn’t fun. I promise.
The other issue with pouring one yard of concrete at one time is the manpower. In order to place and finish that amount of concrete before it starts to set-up, it usually means extra people are required.
I wanted to do my project by myself, without any heavy equipment or trailers to return, and I didn’t want to be rushed.
The Grid Form System

The solution to my problem was the grid shaped forms you see in the photos.
This simple “tic-tac-toe” pattern form made of pressure treated 2×4’s provided me with a number of solutions.
- An improved look – I love the grid pattern and the way the slab looks like large tiles.
- Easy Placing and Finishing – Doing a good job on a 3’x3’ section of concrete is much easier than doing a good job on a 9’x9’ section of concrete, especially for a novice.
- Timing flexibility – I could do one square a day if I wanted to. There is no need to pour the whole slab at once. I did my project over a period of two days.
Creating the grid was easy and only took a couple of hours, eight 10’ long pressure treated 2×4’s, and a handful of coated deck screws.
My area was already sufficiently level, but you would easily be able to level your form with some fill dirt as needed.
A Few Embedded Screws Will Help Long Term
There is a chance that EVENTUALLY (many years from now) the screws holding the forms together could rust through, so in order to keep the perimeter forms from ever falling away, I placed a few screws inside the forms to connect them to the concrete. These aren’t meant as reinforcement, it’s just a little insurance to keep the wood from falling away from the edge.

Sakrete Crack Resistant Concrete
I chose the Sakrete Crack Resistant Concrete Mix after having been so pleased with it on a driveway repair I did last year. This is the perfect concrete for a slab like mine because I wanted to be able to just pour the concrete in without the need for steel wire reinforcement. For a garden type slab like this I just needed a great, easy to mix concrete that would be less likely to develop cracks. This product fit the bill perfectly. It was easy to finish and will stay looking great for many years to come.
I needed about 5 bags per square… 9×5 = 45
45 Eighty pound bags… no problem. I went and picked it up so loading and unloading the truck (two trips) was a chore! Save yourself the trouble and just have your retailer deliver it!

Mixing is Easy
I did all my mixing in a wheelbarrow right in the slab area. This way, after the concrete was mixed I could just dump the wheelbarrow.

- Dump a bag or two into the wheelbarrow, the less concrete you mix at once the easier it is to mix-up, but the more times you have to repeat the process. You can decide what’s comfortable for you.
- Add water per the mix ratio shown on the bag. Extra water can be easier to mix, but it weakens the concrete. In my case I wasn’t too worried about the concrete being at the full specified 4000 psi, so I added a little bit of extra water.
- Mix it up well, then pour it in the square.
Each 3’x3’ square takes about 5 bags.
Finishing the Concrete
One thing about being a general contractor is that the skills you develop are often exactly that… general. I’m generally able to finish concrete. I understand all the steps and the general principles. But I do not think I’d do well finishing a 9’x9’ slab by myself.

But 3’x3’… that I can handle! The beauty of this project is that the squares can be finished one at a time using simple tools. Here’s all I needed:
- steel tooth garden rake (not shown in photo)
- a 16” trowel
- a concrete edger
- A straight board for leveling off the concrete
- A flat shovel
- Water
Follow these simple steps to finish the concrete:
- Use the rake to spread and roughly level the concrete.
- Use the board to level off the concrete and get a trowel ready surface.
- Use the trowel to smooth off the top of the surface as it begins to dry.
- Use the edger tool to create a nice edge along the perimeter of each square.
This video shows these steps:
Leftover Concrete in a Rubber Baking Mold Makes for Awesome Concrete Candles!That’s about all there is too it!
Here are a few more pictures showing the finished product.


Leftover Concrete in a Rubber Baking Mold Makes Awesome Concrete Candles!
This is a sponsored conversation written by me on behalf of Sakrete. The opinions and text are all mine.
var ts=document.getElementById(‘ti-pixel-tracker’); var axel = Math.random() + “”; var num = axel * 1000000000000000000; var ti=document.createElement(“img”); ti.style.display=”none”; ti.src=”http://tracking.tapinfluence.com/trk/91xEj/yTDVb/p.png?p=JHX8z” + String.fromCharCode(38) + “i=R5EQ3” + String.fromCharCode(38) + “ord=”+ num + String.fromCharCode(38) + “s=” + encodeURIComponent(document.referrer); ts.parentNode.replaceChild(ti,ts); JSON.stringify(“program_id”:”7ae15f2e-4244-11e8-b67b-0a1731e943ec”,”post_id”:”66aab9ca-4252-11e8-88e4-068617ee6438″);
The post Pouring a Large Slab by Yourself with Sakrete Crack Resistant Concrete appeared first on RemodelingGuy.net.